
In the dynamic and fast-growing education sector, the accurate recording of student performance and the subsequent generation of comprehensive report cards stand as pivotal tasks.
The quality of these processes has far-reaching implications, impacting student evaluation, parent communication, and overall school credibility. Recognizing the critical role technology plays in modern education, Neverskip steps forward with a seamless solution.
This guide illuminates how to configure Neverskip’s result management system efficiently for mark entry. So, let’s get started.
How To Configure for Mark Entry in Neverskip’s Result Management System?
Neverskip’s student result management system is equipped with simple-to-use, top-notch features that make the configuration for mark entry easier than ever. Let’s see how with this step-wise guide.
1. Get Started

To get started,
Step 1 – Visit app.neverskip.com
Step 2 – Enter your registered email id and password
Step 3 – Click Log in
This dashboard will help you seamlessly navigate to all modules activated for your school in Neverskip.
2. Access Mark Entry and Reports
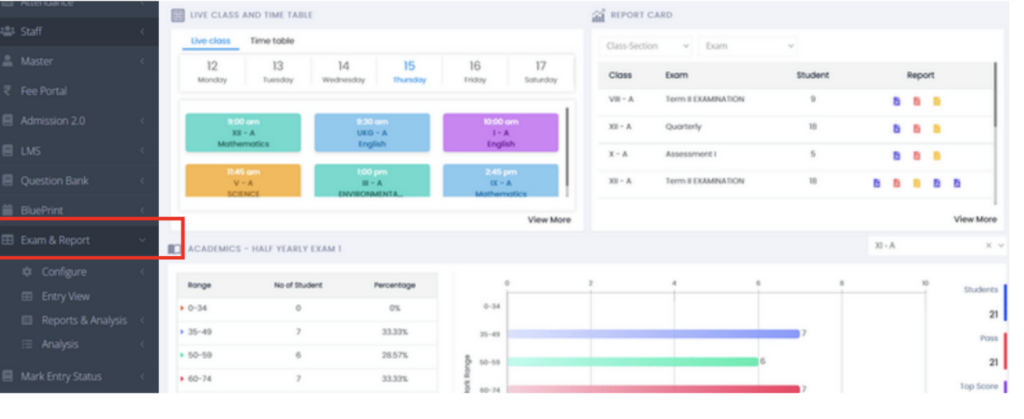
To access Mark Entry and Reports –
Step 1 – Click on the left-hand menu on the dashboard
Step 2 – Click on Exam & Report
3. Complete Student Mapping
Before configuring any settings within the “Exam & Report” section, it’s imperative to finalize student mapping. This crucial step serves as the foundation for configuring various aspects such as subjects, subject teachers, exams, mark entry, and report card generation. To accomplish student mapping, follow the steps below –
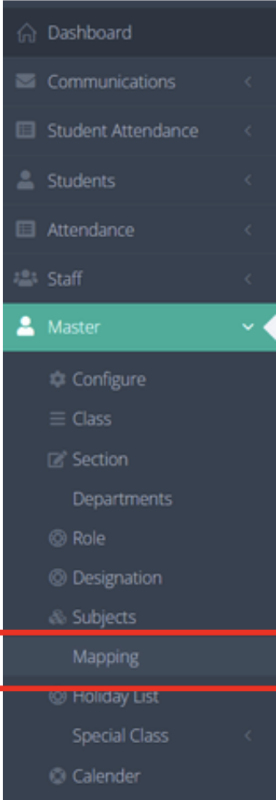
Step 1- Click on Master on the left-hand menu From the drop-down
Step 2 – Click on Mapping
Then the following screen will appear, giving you access to map subject – class – teacher-student.
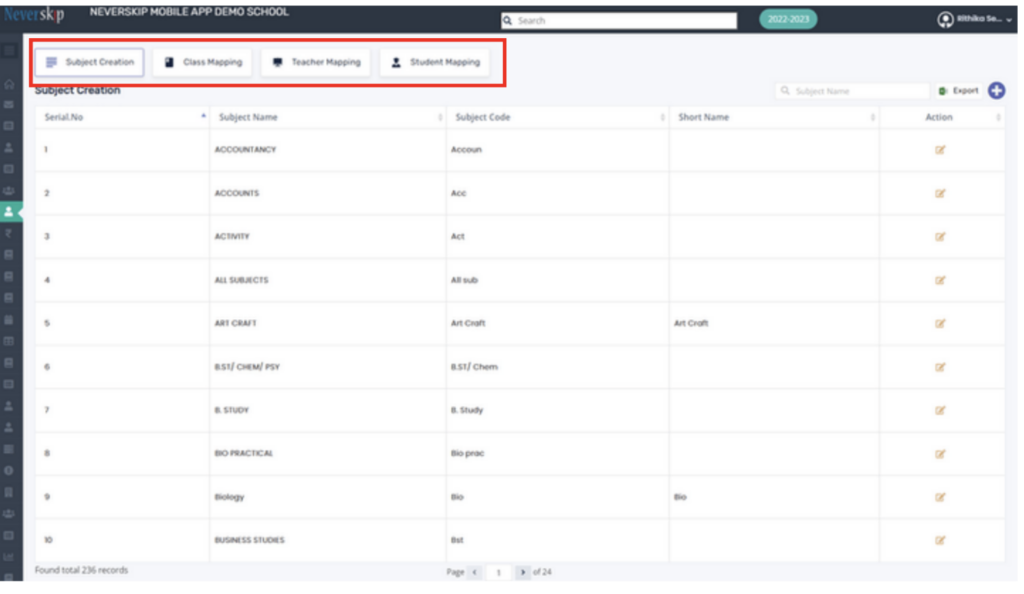
Subject Creation
Next, you need to view the subjects created. For that –
Step 1 – Click on the tab Subject Creation. A list will appear giving you a view of the subjects, and subject codes that have been created.
Step 2 – To add a new subject for the first time or add to the existing list: Click on ‘+’ icon
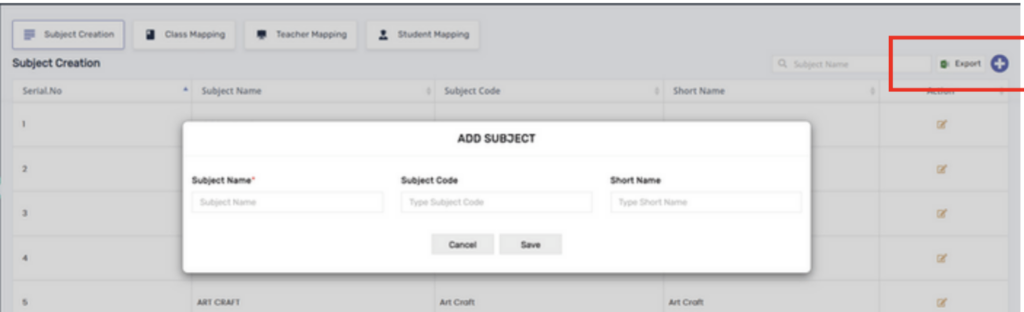
Step 3 – Enter the name of the subject, the subject code, and any short form as per your convenience.
Step 4 – Click Save
If you want to cancel the attempt to add a subject click, Cancel.
4. Execute Class Mapping
To view the classes mapped to different subjects –
Step 1 – Click on the tab Class Mapping. You will find that subjects are differentiated as Primary, Core, Language II, Language III, and Additional Subjects.
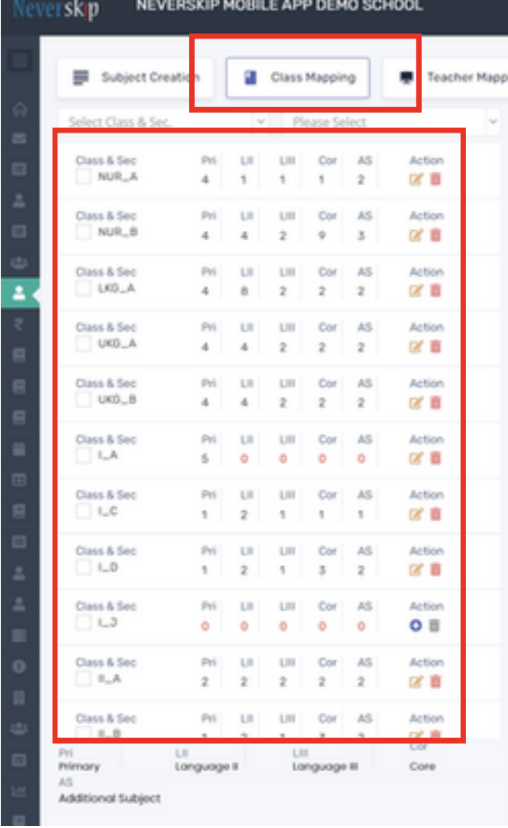
Step 2 – On the left side, view all classes and sections under which subjects are mapped such as –
Pri: Primary Subjects
L II: Language II
L III: Language III
Cor: Core Subjects
AS: Additional Subject
And so on.
Note that the number below each Subject Mapping Terminology shows the number of subjects mapped to it.
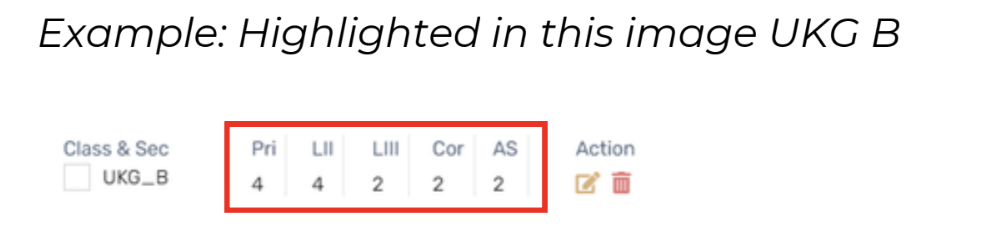
Example: Highlighted in this image UKG B
Here 4 subjects are mapped as Primary Subjects, 4 as Language II, 2 as Language III, 2 as Core Subjects, and 2 as Additional Subjects. You can also select a specific grade or section to view the subjects mapped under different categories.
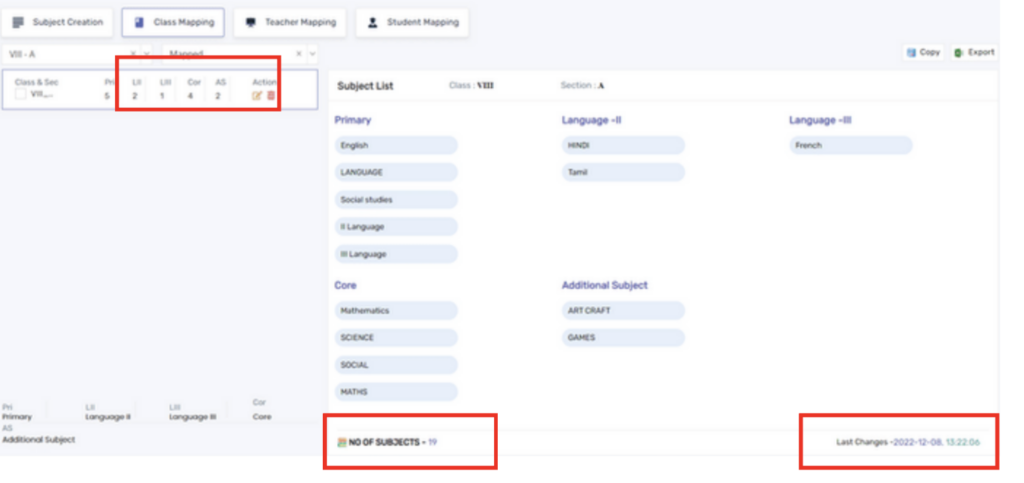
- On the bottom left, you can view the total number of subjects for the specific grade/section.
- On the bottom right you can view details like date and time on when the last changes were made to the particular setting.
Also, you can easily copy the subjects of one section/class to another class by following these steps –
Step 1 – Click on Copy

As shown above, if subjects in VIII A are relevant to VIII B, then you will be given the option to copy the same subjects to VIII B. The same mapping (subject categories) will be applied in VIII B as well.
Step 2 – Enter/select the class to which the subjects need to be copied .
Step 3 – Once entered click Move .

If you want to cancel the attempt, click Cancel.
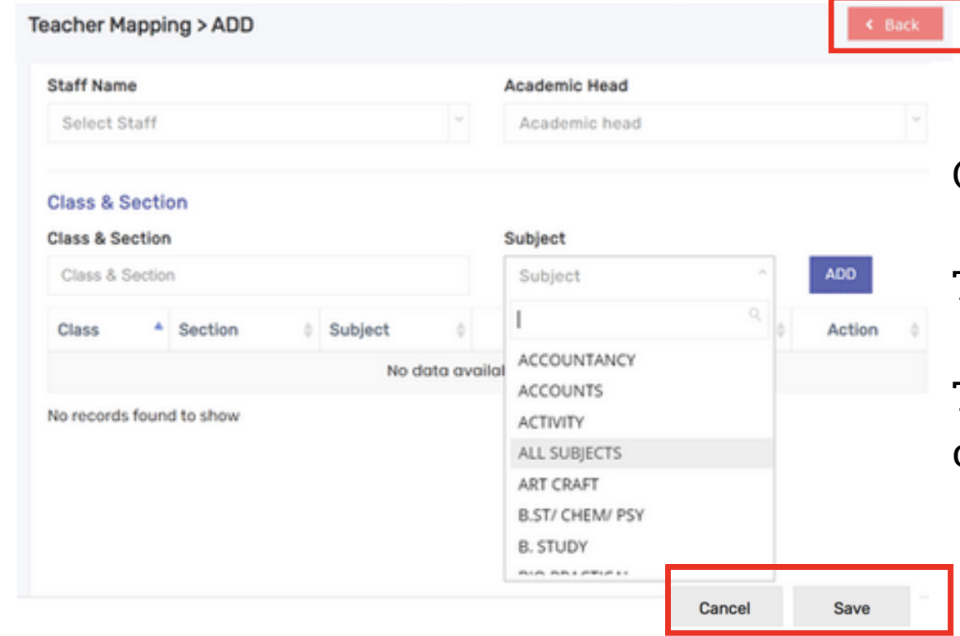
5. Complete Teacher Mapping
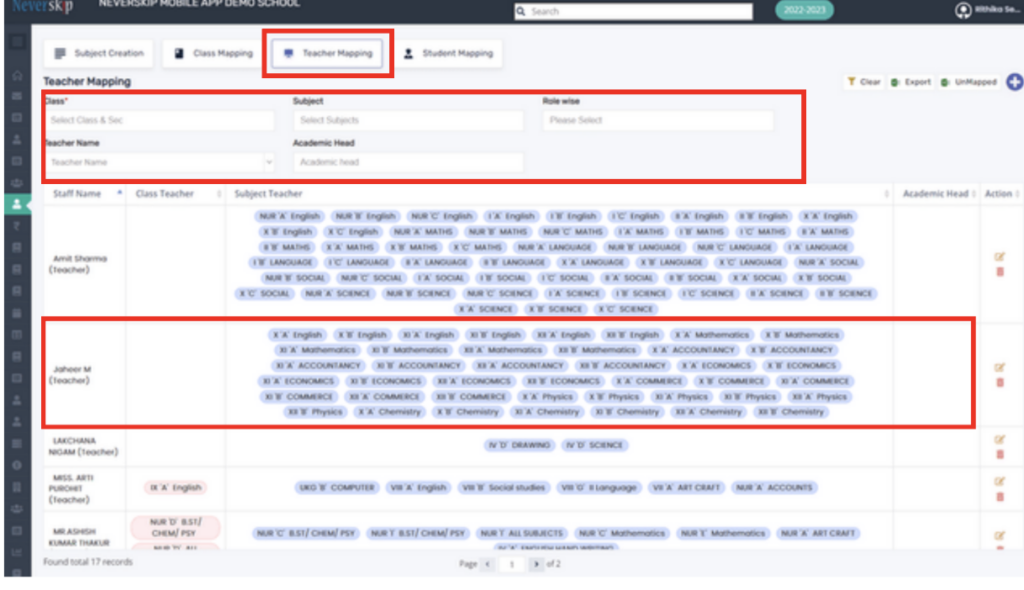
To view teachers mapped to different classes and subjects, follow the steps below –
Step 1 – Click on the tab Teacher Mapping. All subjects and classes mapped will be visible.
Step 2 – You can also filter data for specific class/teacher/subject/role as well using the filter option available if needed.
If you want to map a new staff for the first time or add to the existing list, follow the steps below –
Step 1 – Click on ‘+’ icon
Step 2 – Enter the staff name, the name of the Academic Head (if applicable), mention the class & section applicable to the staff, and choose the subjects available from the drop-down.
Step 3 – Once entered click Save
To cancel the attempt click Cancel and to go back to the teacher mapping list click ‘Back.’
6. Complete the Configuration
Once the mapping is complete, you need to configure settings that will let you create exams, calculate grades and generate report cards.
- To configure settings, click on Exam & Report.
- The global setting helps configure the basic requirements of the school with respect to mark entry and report card publishing.
To access the school settings,
Step 1 – Click on Configure on the left-hand menu.
Step 2 – From the drop-down click on School Setting.
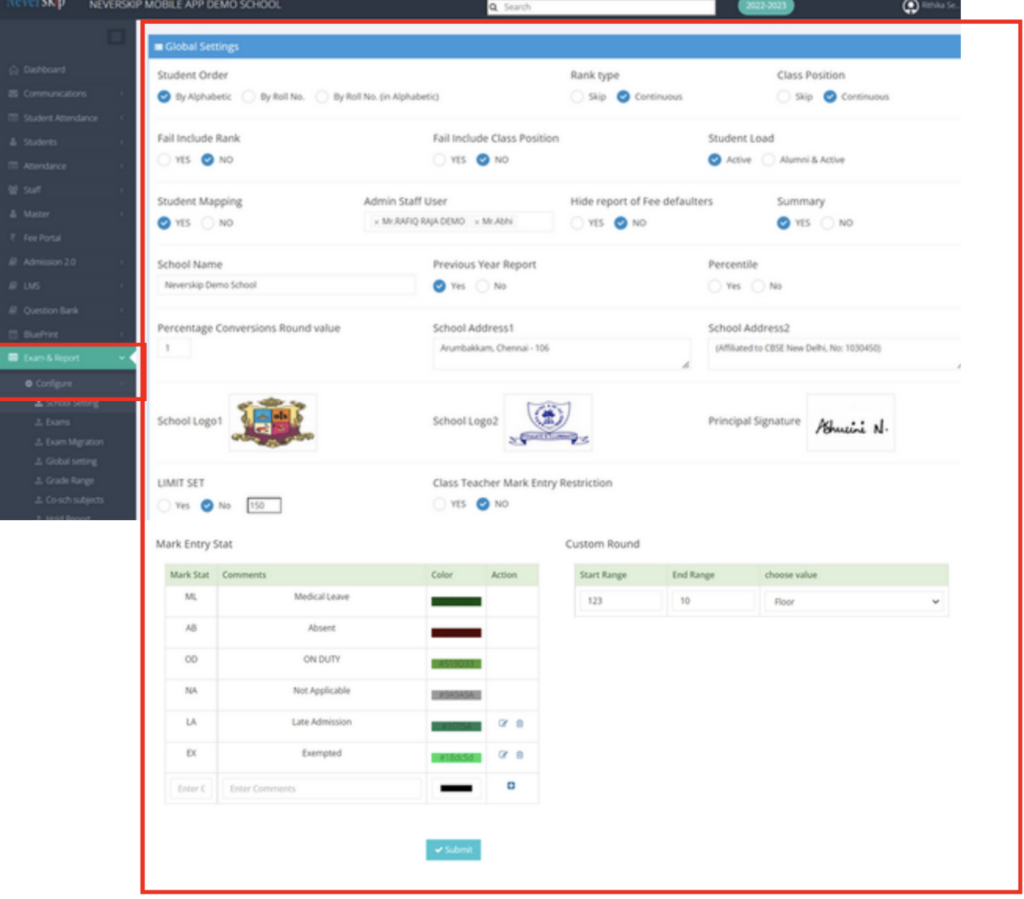
Step 3 – Enter/update all required fields and click on Submit.
And that’s it! You are done with configuring your system for mark entry.
If you are yet to try our product, check it out now!
Book a free demo to explore more!

Top Features of a School Feedback Management System
September 4, 2023